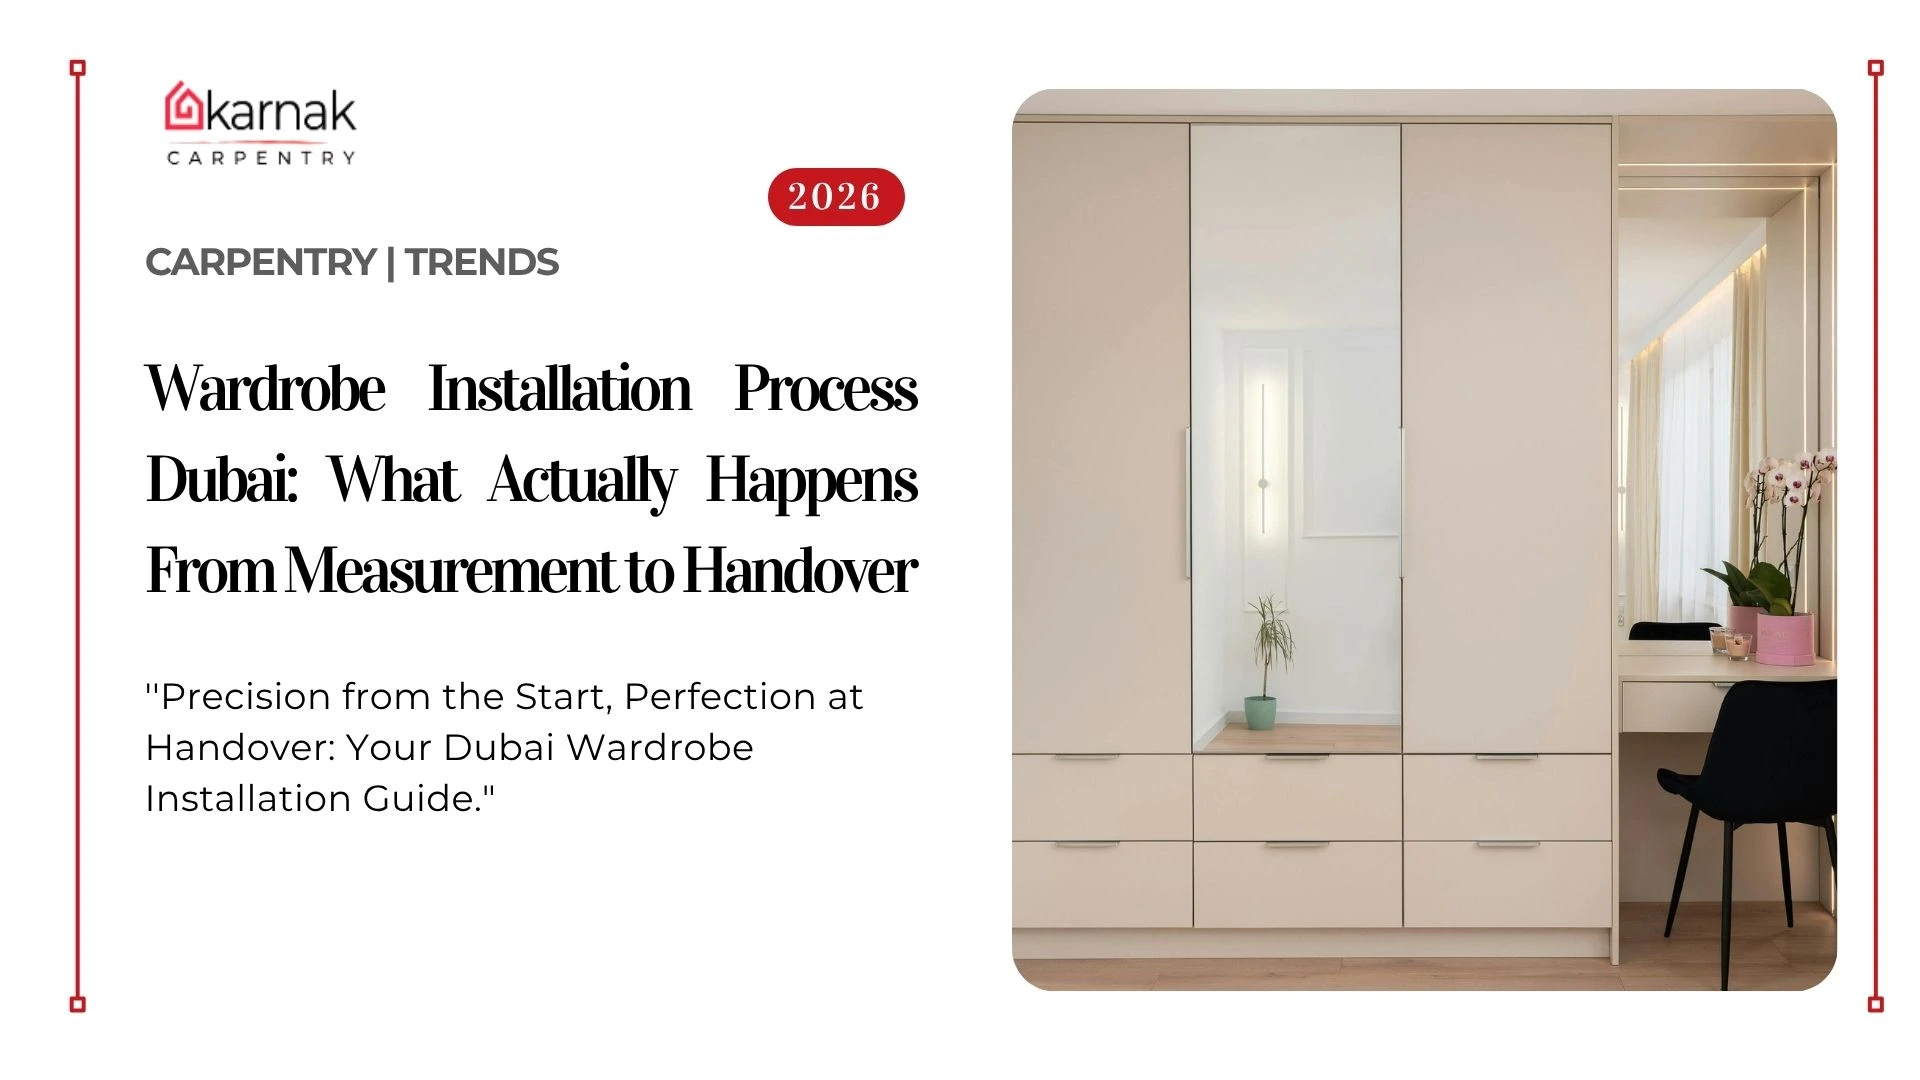
Most homeowners in Dubai think wardrobe installation is simple. You pick a design, a team shows up, they fit the wardrobe, done. What actually happens is far more involved, and understanding the full process is the difference between a wardrobe that performs perfectly for 20 years and one that starts causing problems inside 18 months.
We have been fitting wardrobes in Dubai since 1988. That is over 35 years and more than 10,000 projects across Dubai Marina, Emirates Hills, Palm Jumeirah, Arabian Ranches, JBR, Downtown, and virtually every community in between. We have seen every possible variation of what can go right and what can go wrong. This guide walks you through the complete process, step by step, exactly as we do it, with the specific details that most companies either do not know or do not share. From measurement to final handover, following a professional process ensures excellent results. For the latest lifestyle and home-related stories in Dubai, Gulf News is an excellent daily resource.
By the end of this, you will understand why a quality installation takes the time it takes, what questions to ask any carpenter before they start work, and why the UAE environment demands a different standard than what you might have read about on a UK or American interiors blog.
Why Wardrobe Installation in Dubai Is Different From Anywhere Else
Before we talk process, we need to talk context. Dubai is not London. It is not Singapore. The conditions here create specific challenges that affect every single stage of the wardrobe installation process, and any carpenter who does not acknowledge this is either inexperienced or not paying attention.
The humidity in Dubai fluctuates significantly. Coastal areas like JBR and Dubai Marina regularly see relative humidity above 80 percent in summer. Inland communities like Arabian Ranches and DAMAC Hills sit lower, but the combination of heat and aggressive air conditioning creates its own problems. Boards that were dimensionally stable when manufactured can shift slightly once they enter a building with a specific humidity profile. Walls in many Dubai properties are not as straight as they appear. And buildings are still settling, especially in newer developments where construction completed within the last five to seven years.
On top of that, Dubai has a strong culture of renovation and resale. Wardrobes here need to look as good on day one as they do when a tenant moves out five years later. They need to handle heat that a European wardrobe would never encounter, including the passive heat buildup that happens when an apartment is unoccupied in summer with the AC on economy mode.
These are not abstract concerns. They are the reason we developed our installation process the way we did, and why we keep refining it.
Stage 1: The Initial Consultation and Site Visit
What Happens in a Real Consultation
The consultation is not a sales pitch. Done properly, it is a diagnostic exercise. When a Karnak team visits your home before quoting, we are gathering information that directly affects how we design and price the installation.
We look at the walls. In Dubai properties, especially in older buildings in Deira, Bur Dubai, and Karama, walls can be genuinely out of plumb by 10 to 15 millimeters over a three-meter height. That matters enormously for a floor-to-ceiling fitted wardrobe. We look at the ceiling, because many apartments have a small slope across the room that is invisible to the eye but will create a visible gap at the top of a wardrobe if not accounted for.
We check what is behind the wall. Electrical conduits, water pipes, and structural elements are all common behind bedroom walls in UAE residential builds, and a serious carpenter maps them before drilling or fixing anything. We have seen wardrobes in other companies’ work where fixings have gone directly through an electrical conduit. That is a dangerous mistake that a proper pre-installation check prevents entirely.
We also ask about your lifestyle. How many people share the wardrobe, what proportion of hanging versus folded storage you need, whether you have long gowns or mostly shorter items, whether you want pull-out accessories like belt trays or jeweler drawers. This shapes the interior layout before the design phase begins.
Why a Quote Without a Site Visit is Unreliable
A quote given remotely, based only on measurements you send over WhatsApp, is an estimate at best. Sometimes it will be accurate. Often it will not be. Hidden walls, unexpected structural elements, ceiling drops, or access challenges for delivery can all affect the final scope and cost. We never commit to a final price without a site visit because doing so is not fair to the client.
If a company quotes you a very precise number over the phone before seeing your space, treat that number with appropriate skepticism.
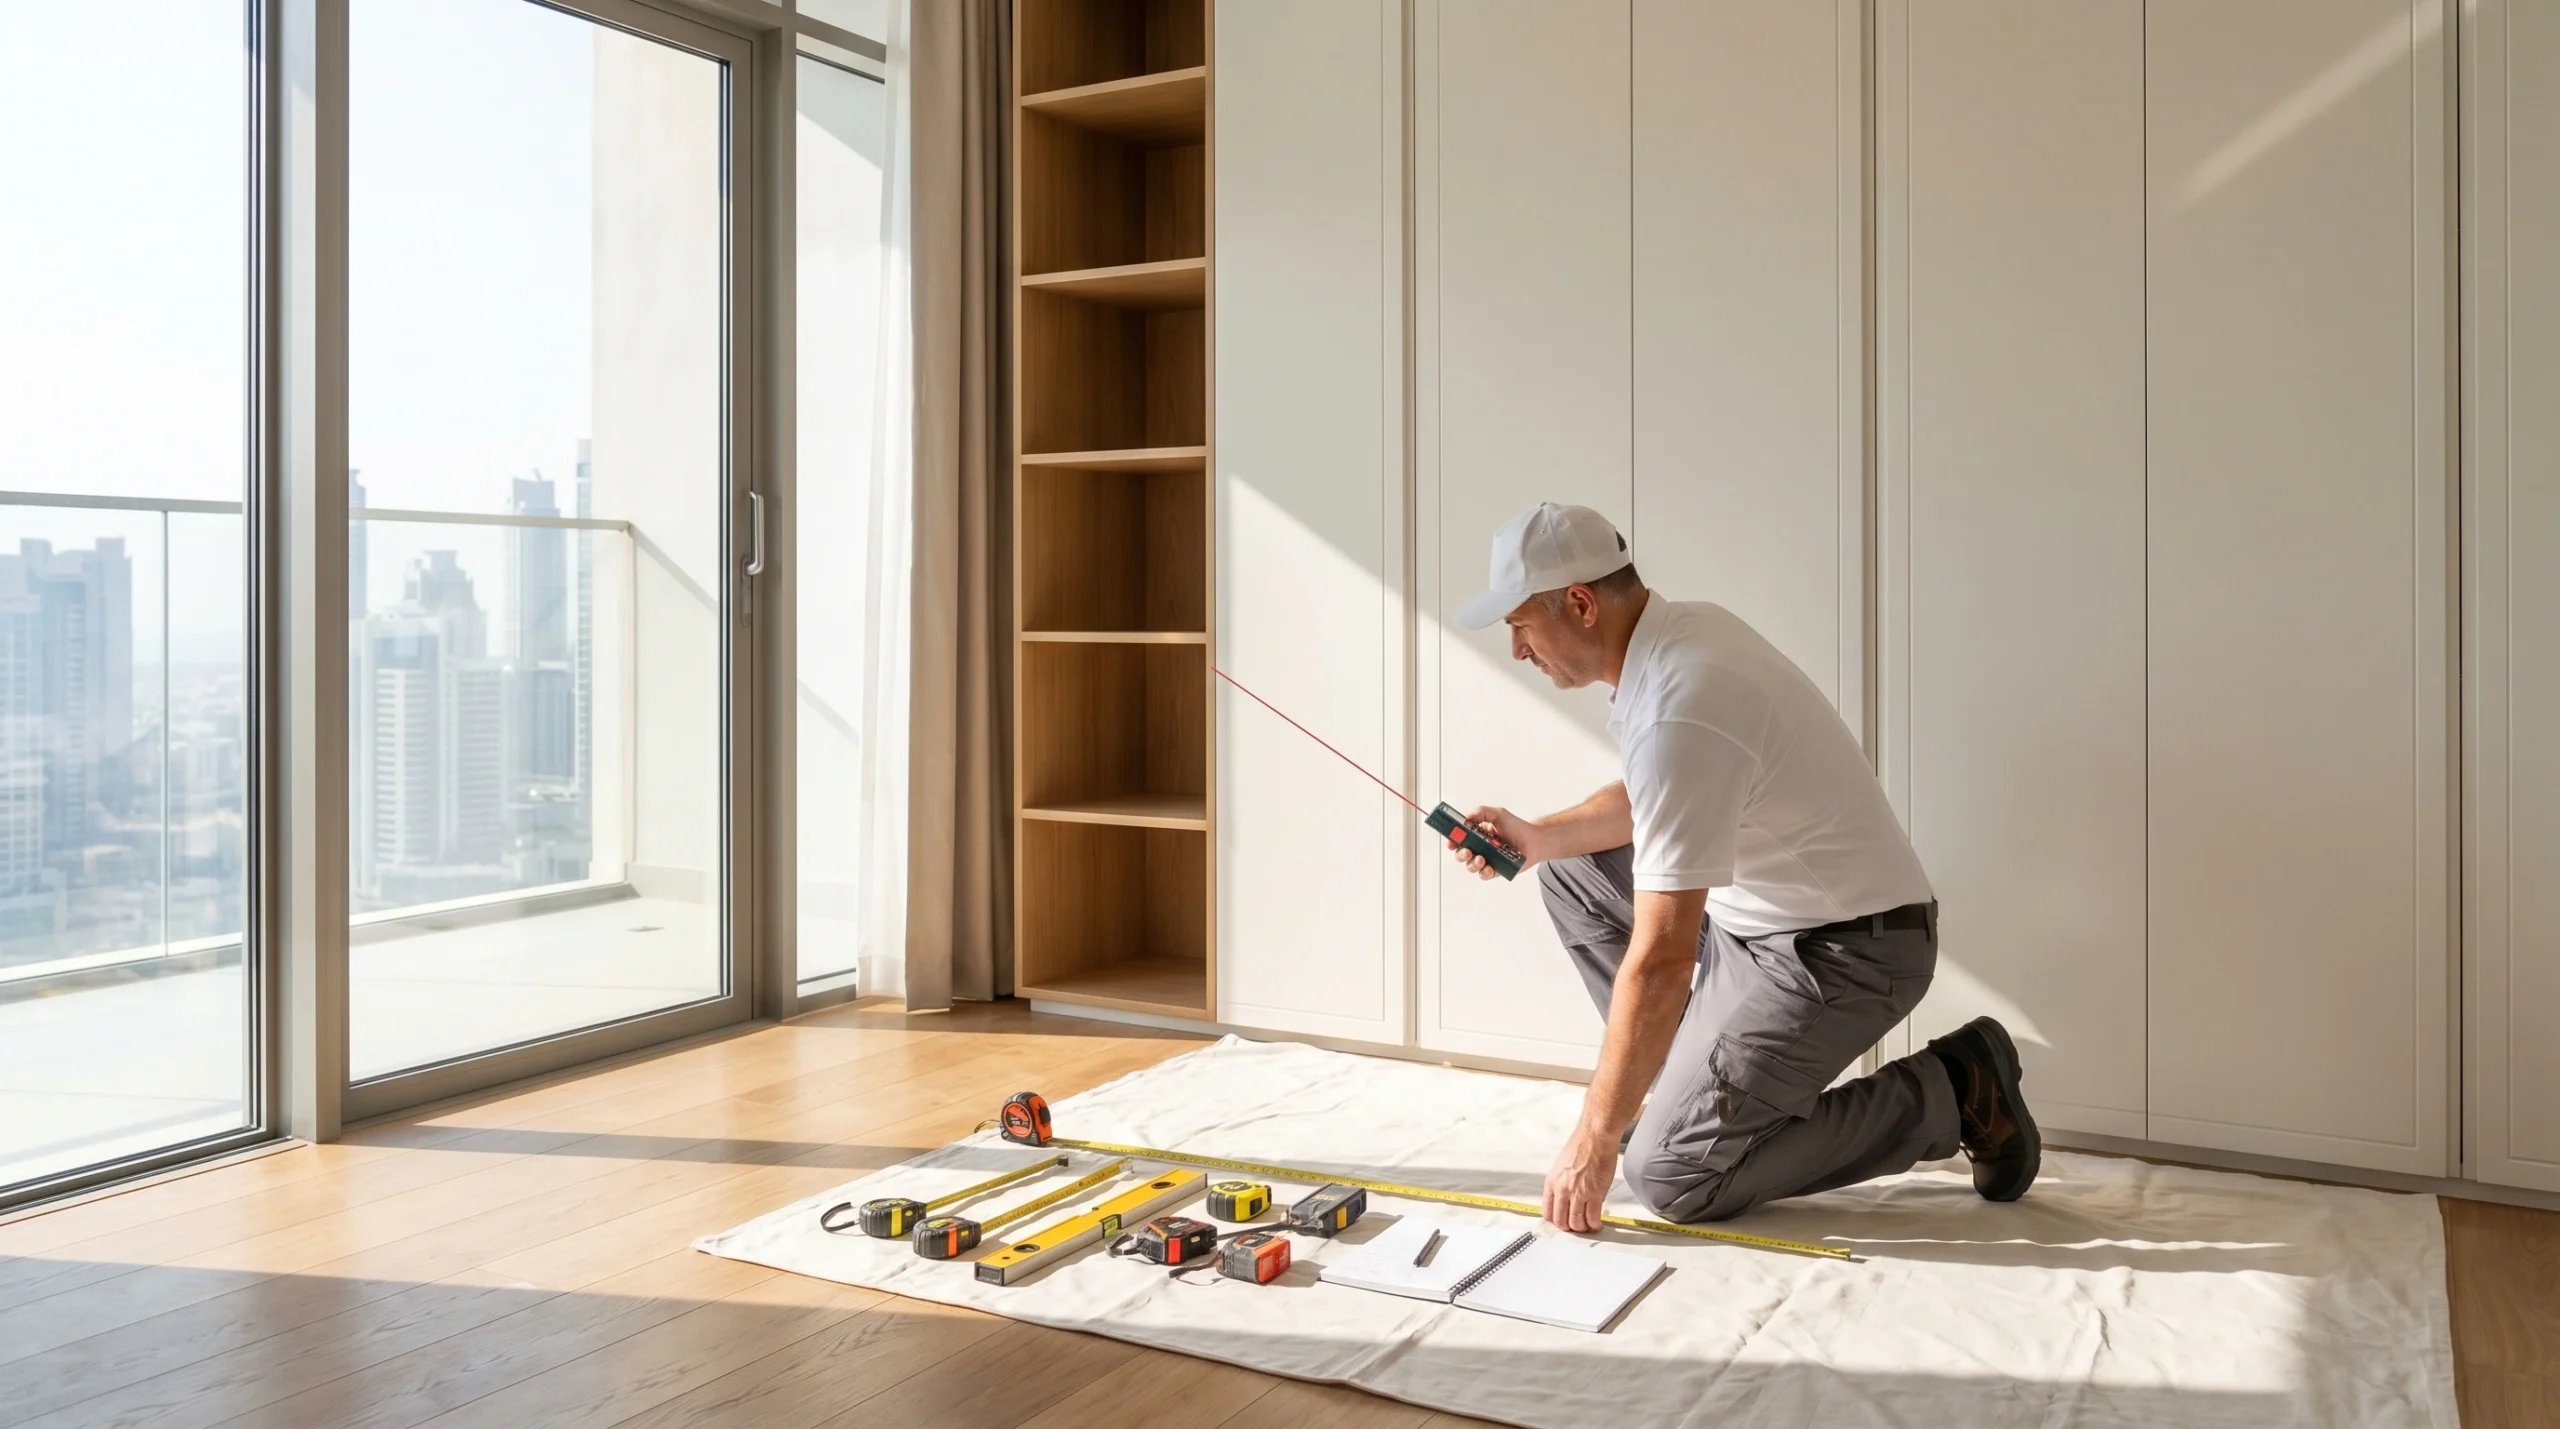
Stage 2: Measurement, and Why It Takes as Long as It Does
The Tolerance That Separates Good Installations From Great Ones
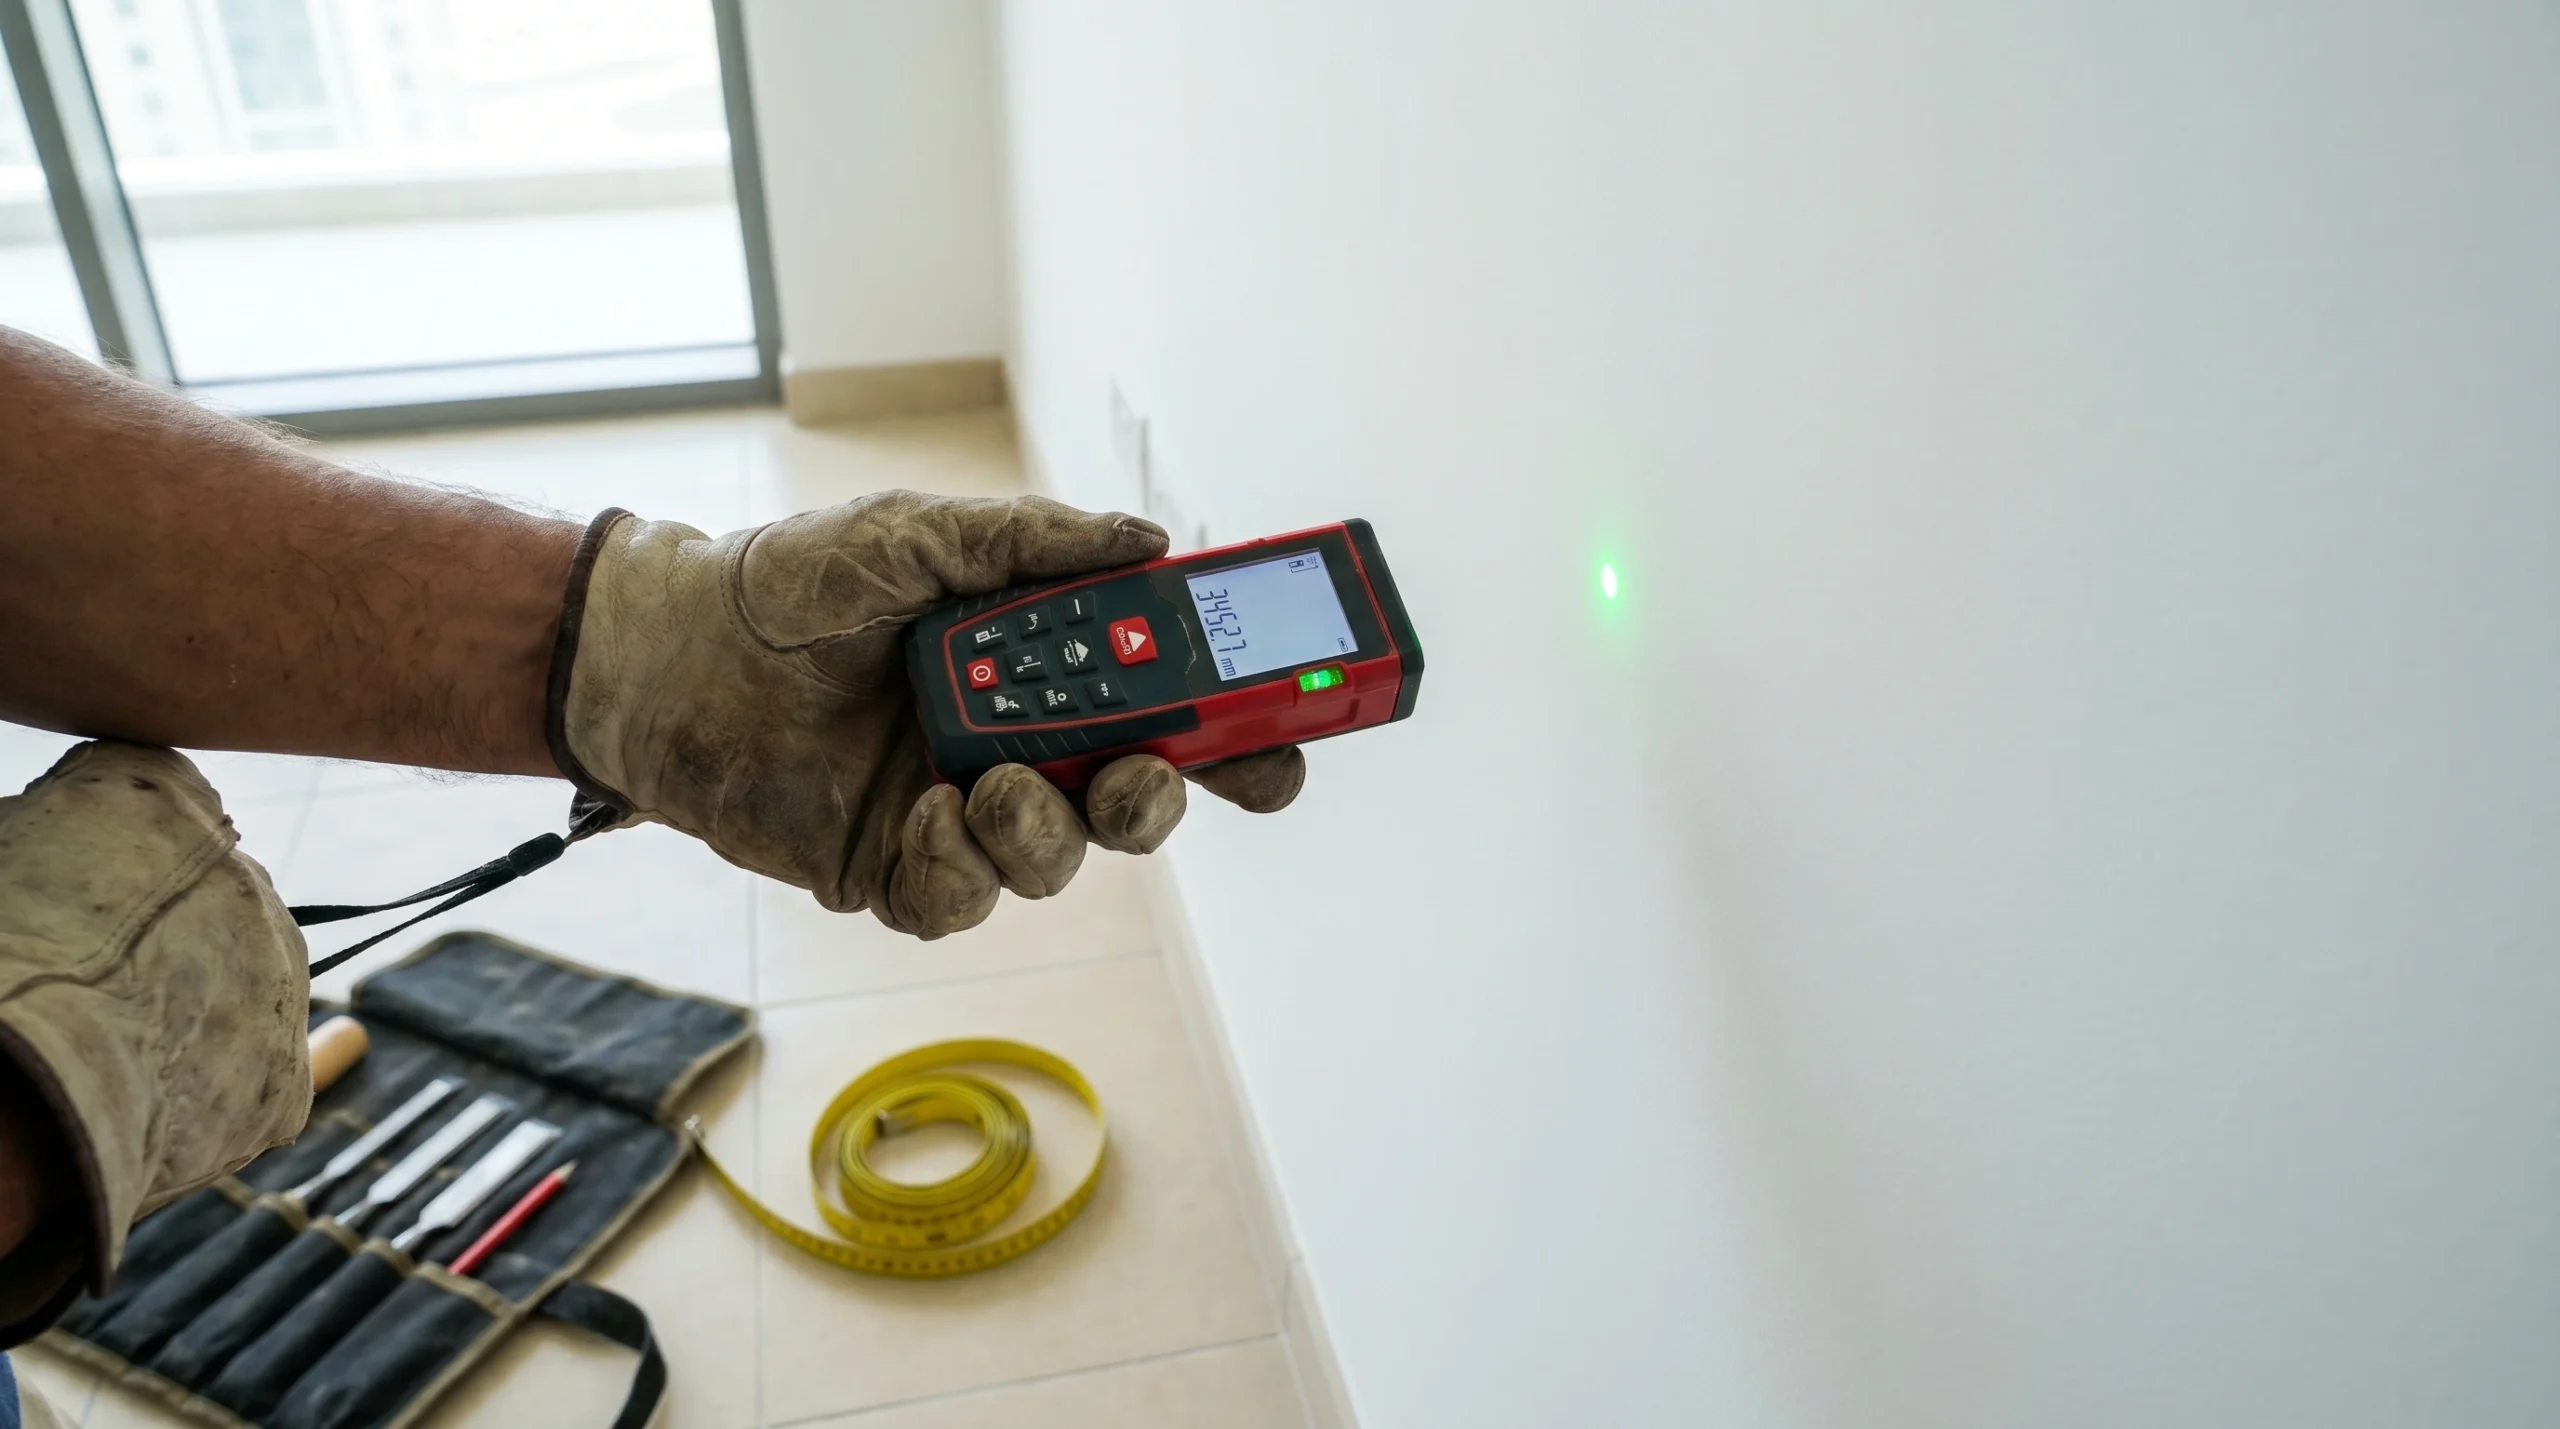
Professional wardrobe measurement in UAE works to a tolerance of plus or minus 1.5 millimeters. That is not a standard we invented. It is what the materials and the installation method demand. If a board is cut even 3 millimeters too wide, it will not fit cleanly. If it is cut 3 millimeters too narrow, you get a visible gap that collects dust and looks poor from day one.
We measure every wall dimension at three heights: floor level, mid-height, and at the ceiling line. Why three heights? Because walls in residential UAE properties are rarely perfectly uniform. We have measured rooms in newer developments in Mohammed Bin Rashid City where the wall dimension at floor level differs by 8 millimeters from the same wall at ceiling height. To a builder, that is within tolerance for construction. To a carpenter fitting a floor-to-ceiling wardrobe, that 8 millimeters is the difference between a good job and a problematic one.
We also check for floor levelness using a spirit level and, on larger projects, a laser level. Floors in UAE apartments can have a camber across a room. We have worked in units in JBR where one corner of the bedroom floor was 11 millimeters higher than the opposite corner. If the wardrobe base is not scribed to account for this, the doors will not hang true, drawers will not slide properly, and the overall structure will carry uneven load.
The Full Measurement Protocol
A proper measurement visit for a single standard wardrobe bay takes approximately 30 to 45 minutes. For a large walk-in wardrobe, plan for 90 minutes to two hours. Anyone measuring a complex wardrobe space in under 20 minutes is either very experienced and moving quickly, or cutting corners. Here is what a thorough measurement covers:
Wall width at floor, mid, and ceiling height. Wall height at multiple points across the span. Floor levelness across the entire footprint. Ceiling height at each corner and midpoint. Position and depth of any skirting boards or architrave that affects the fit. Exact location of all electrical outlets, switches, and light fittings. Location of any air conditioning vents or returns. Position of windows and doors relative to the wardrobe space. Any structural columns, beams, or pilasters within or adjacent to the wardrobe zone.
All of this data is documented. It feeds directly into the fabrication drawings, so the workshop knows exactly what they are cutting and why.
Stage 3: Design Confirmation and Material Selection
Matching the Design to the Space and the Climate
After measurement, you will typically have a design consultation where you confirm or adjust the interior layout. This is the stage where most clients make changes, and making those changes now costs nothing. Making them after fabrication has begun is expensive and adds significant time.
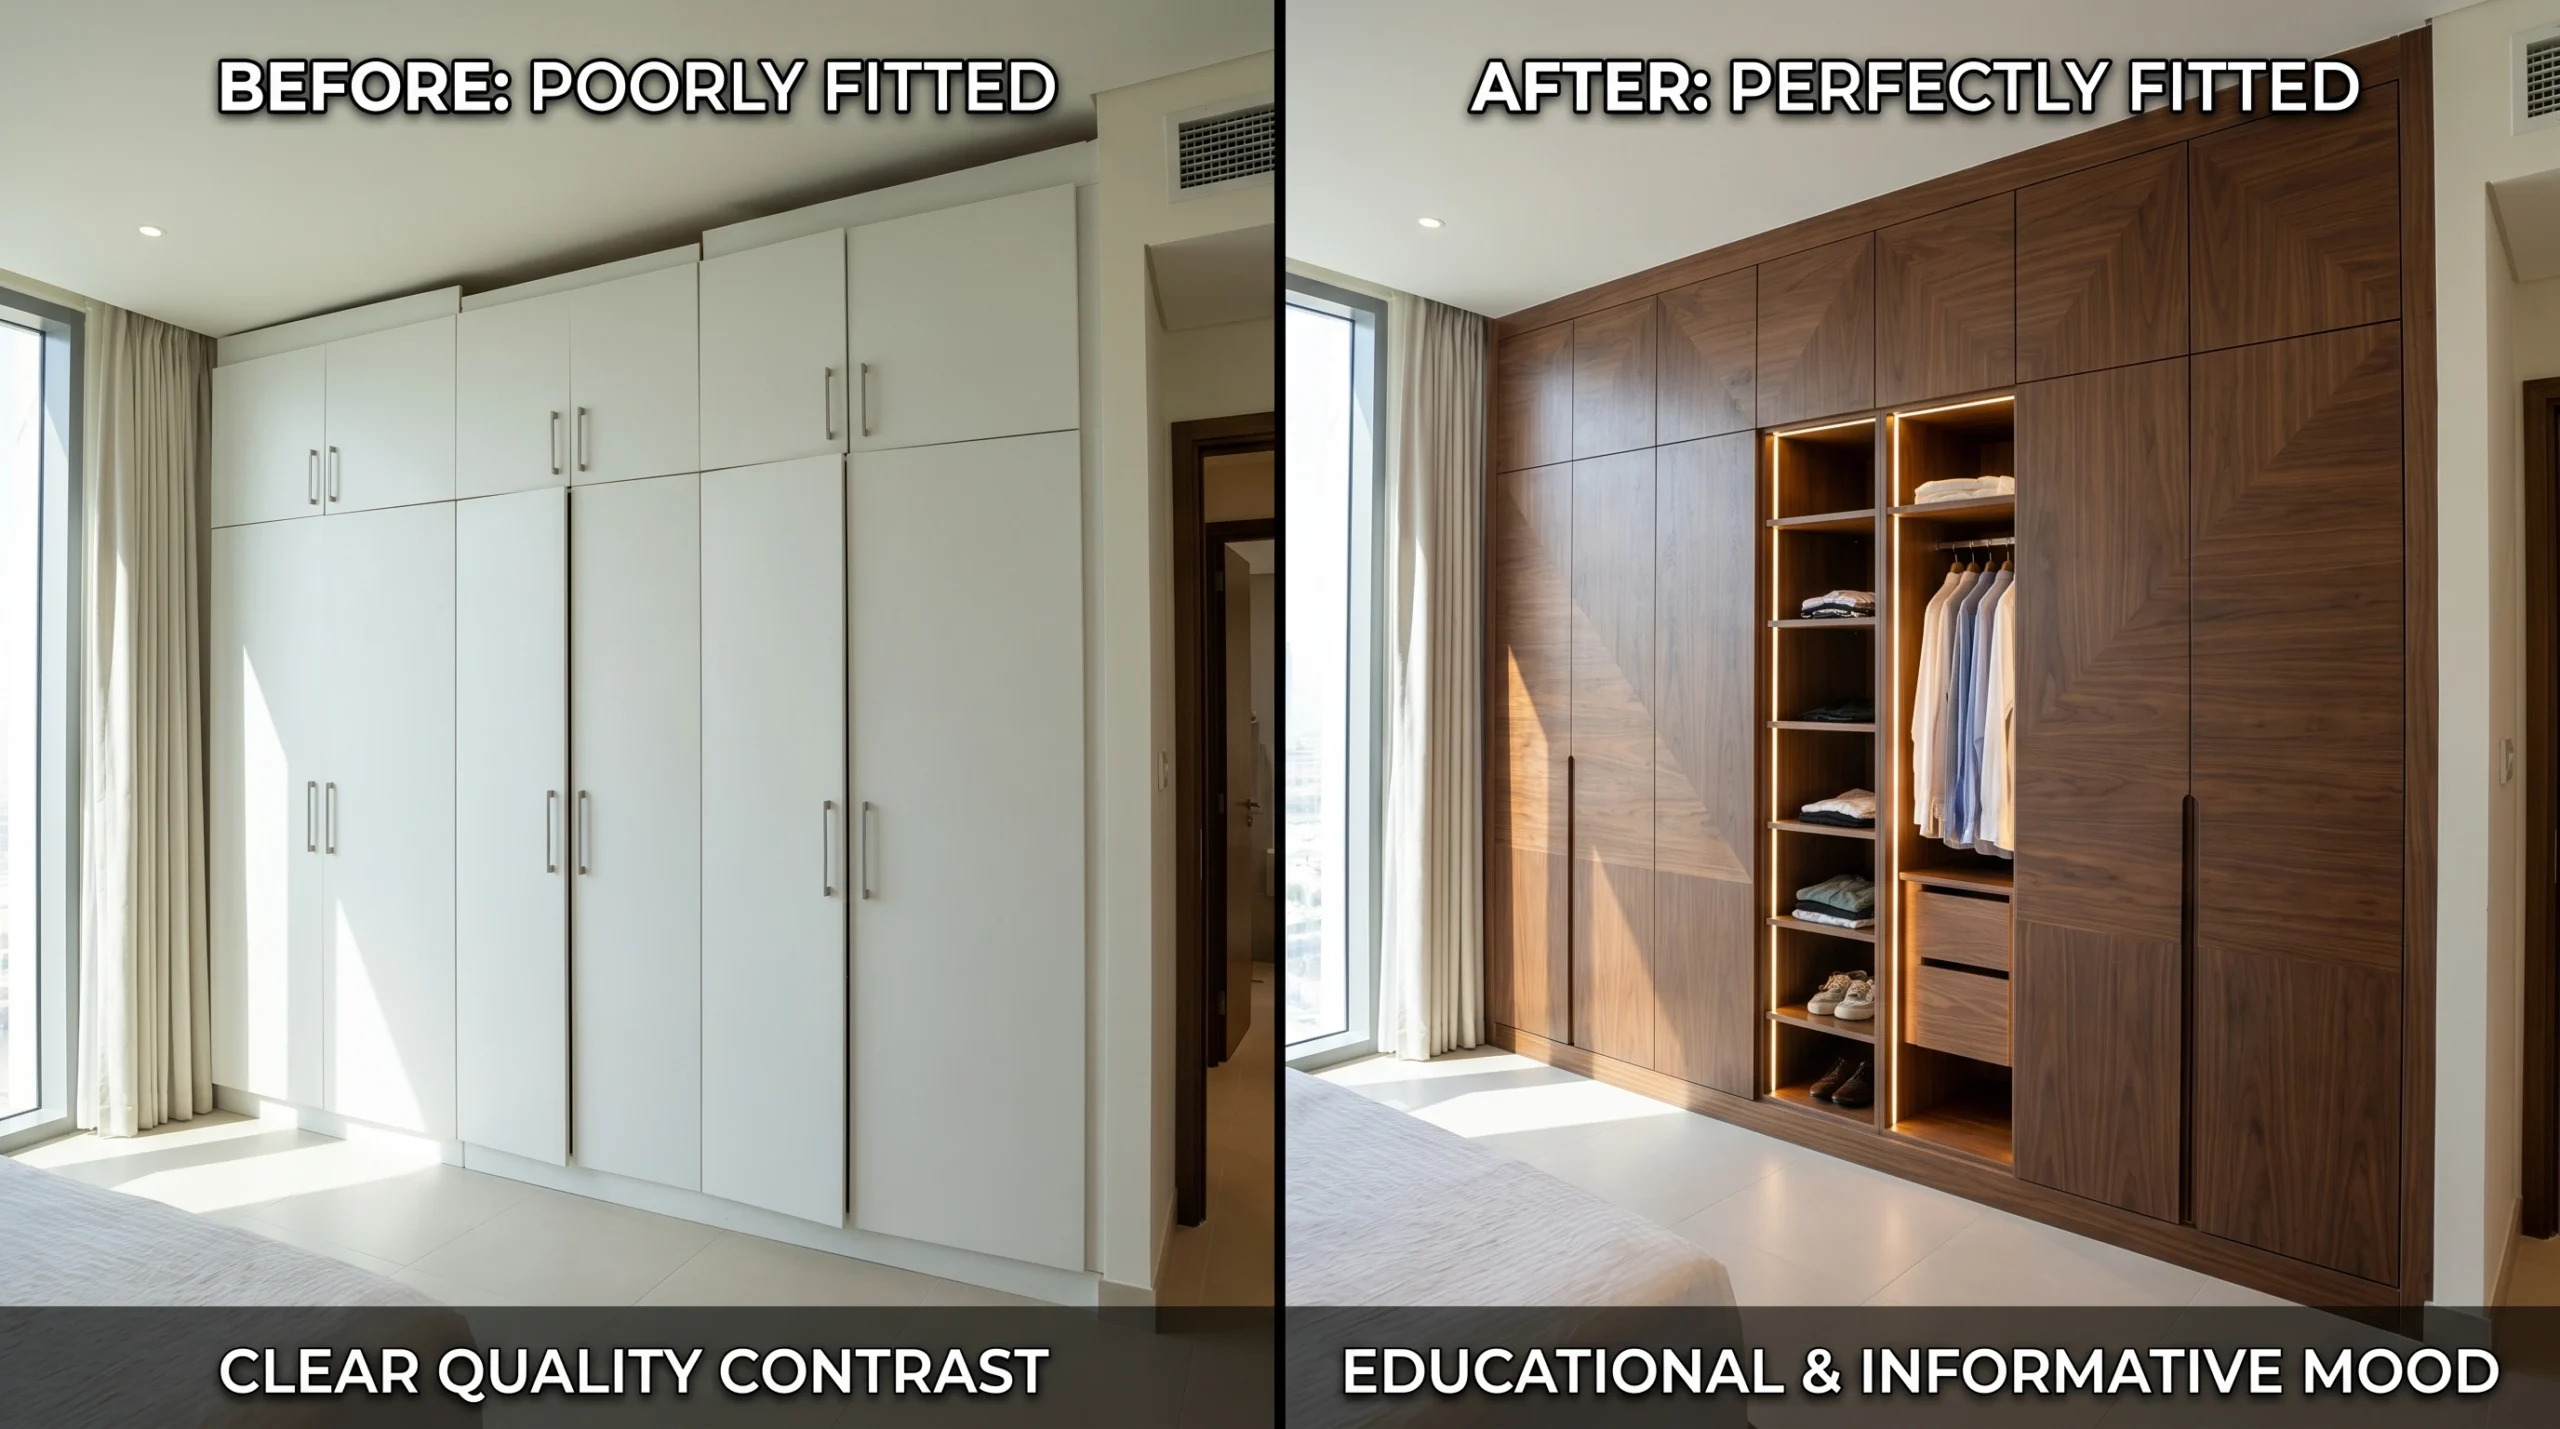
The material conversation is important in Dubai specifically. The standard board in UAE joinery work is moisture-resistant MDF or melamine-faced chipboard with a moisture-resistant core. Standard chipboard, the kind used widely in lower-cost furniture manufacturing, will absorb moisture in humid conditions and begin to swell and delaminate over time. We have seen wardrobes fitted with unsuitable board materials in coastal Dubai apartments develop visible swelling along their base panels within two to three years, particularly in units that are rented out and sometimes left with the AC off during vacancies.
For walk-in wardrobes in higher-humidity environments, we specify a higher-grade moisture-resistant board and ensure all cut edges are sealed, particularly the base panels that sit closest to the floor. In premium projects on the Palm or in Emirates Hills, we often work with solid timber veneers over an engineered moisture-resistant substrate, which gives the aesthetic of real wood with the stability of engineered board.
Hardware Selection and Its Long-Term Impact
Hinges, drawer runners, and door tracks are not interchangeable commodities. The hardware you choose determines how the wardrobe feels to use every single day and how long it performs without adjustment.
We use soft-close hinges on all our fitted wardrobe doors as a standard, not an upgrade. In Dubai households, doors get used by multiple family members, sometimes enthusiastically. Soft-close mechanisms prevent the door slam that loosens fixings over time, protects the door face, and is simply more pleasant to live with. We specify hinges rated for a minimum of 100,000 open and close cycles, which in a typical family home translates to approximately 15 to 20 years of normal use before any degradation.
Drawer runners in a quality installation should be full-extension, meaning the drawer pulls out completely so you can access the full depth of the drawer, and should be rated for a minimum of 30 kilograms per drawer. Many cheaper installations use undermount runners rated for 15 to 20 kilograms. That sounds adequate until you have a drawer full of folded jeans or heavy knitwear.
Sliding door track systems deserve specific attention in UAE. The bottom track is the critical component. It must be level, the floor underneath it must be stable, and the track itself must be robust enough to handle daily use without deflection. For sliding doors wider than 900 millimeters, we use a dual-track system with a top guide as well as a bottom track, which prevents the door from racking under its own weight over time.
Stage 4: Fabrication in the Workshop
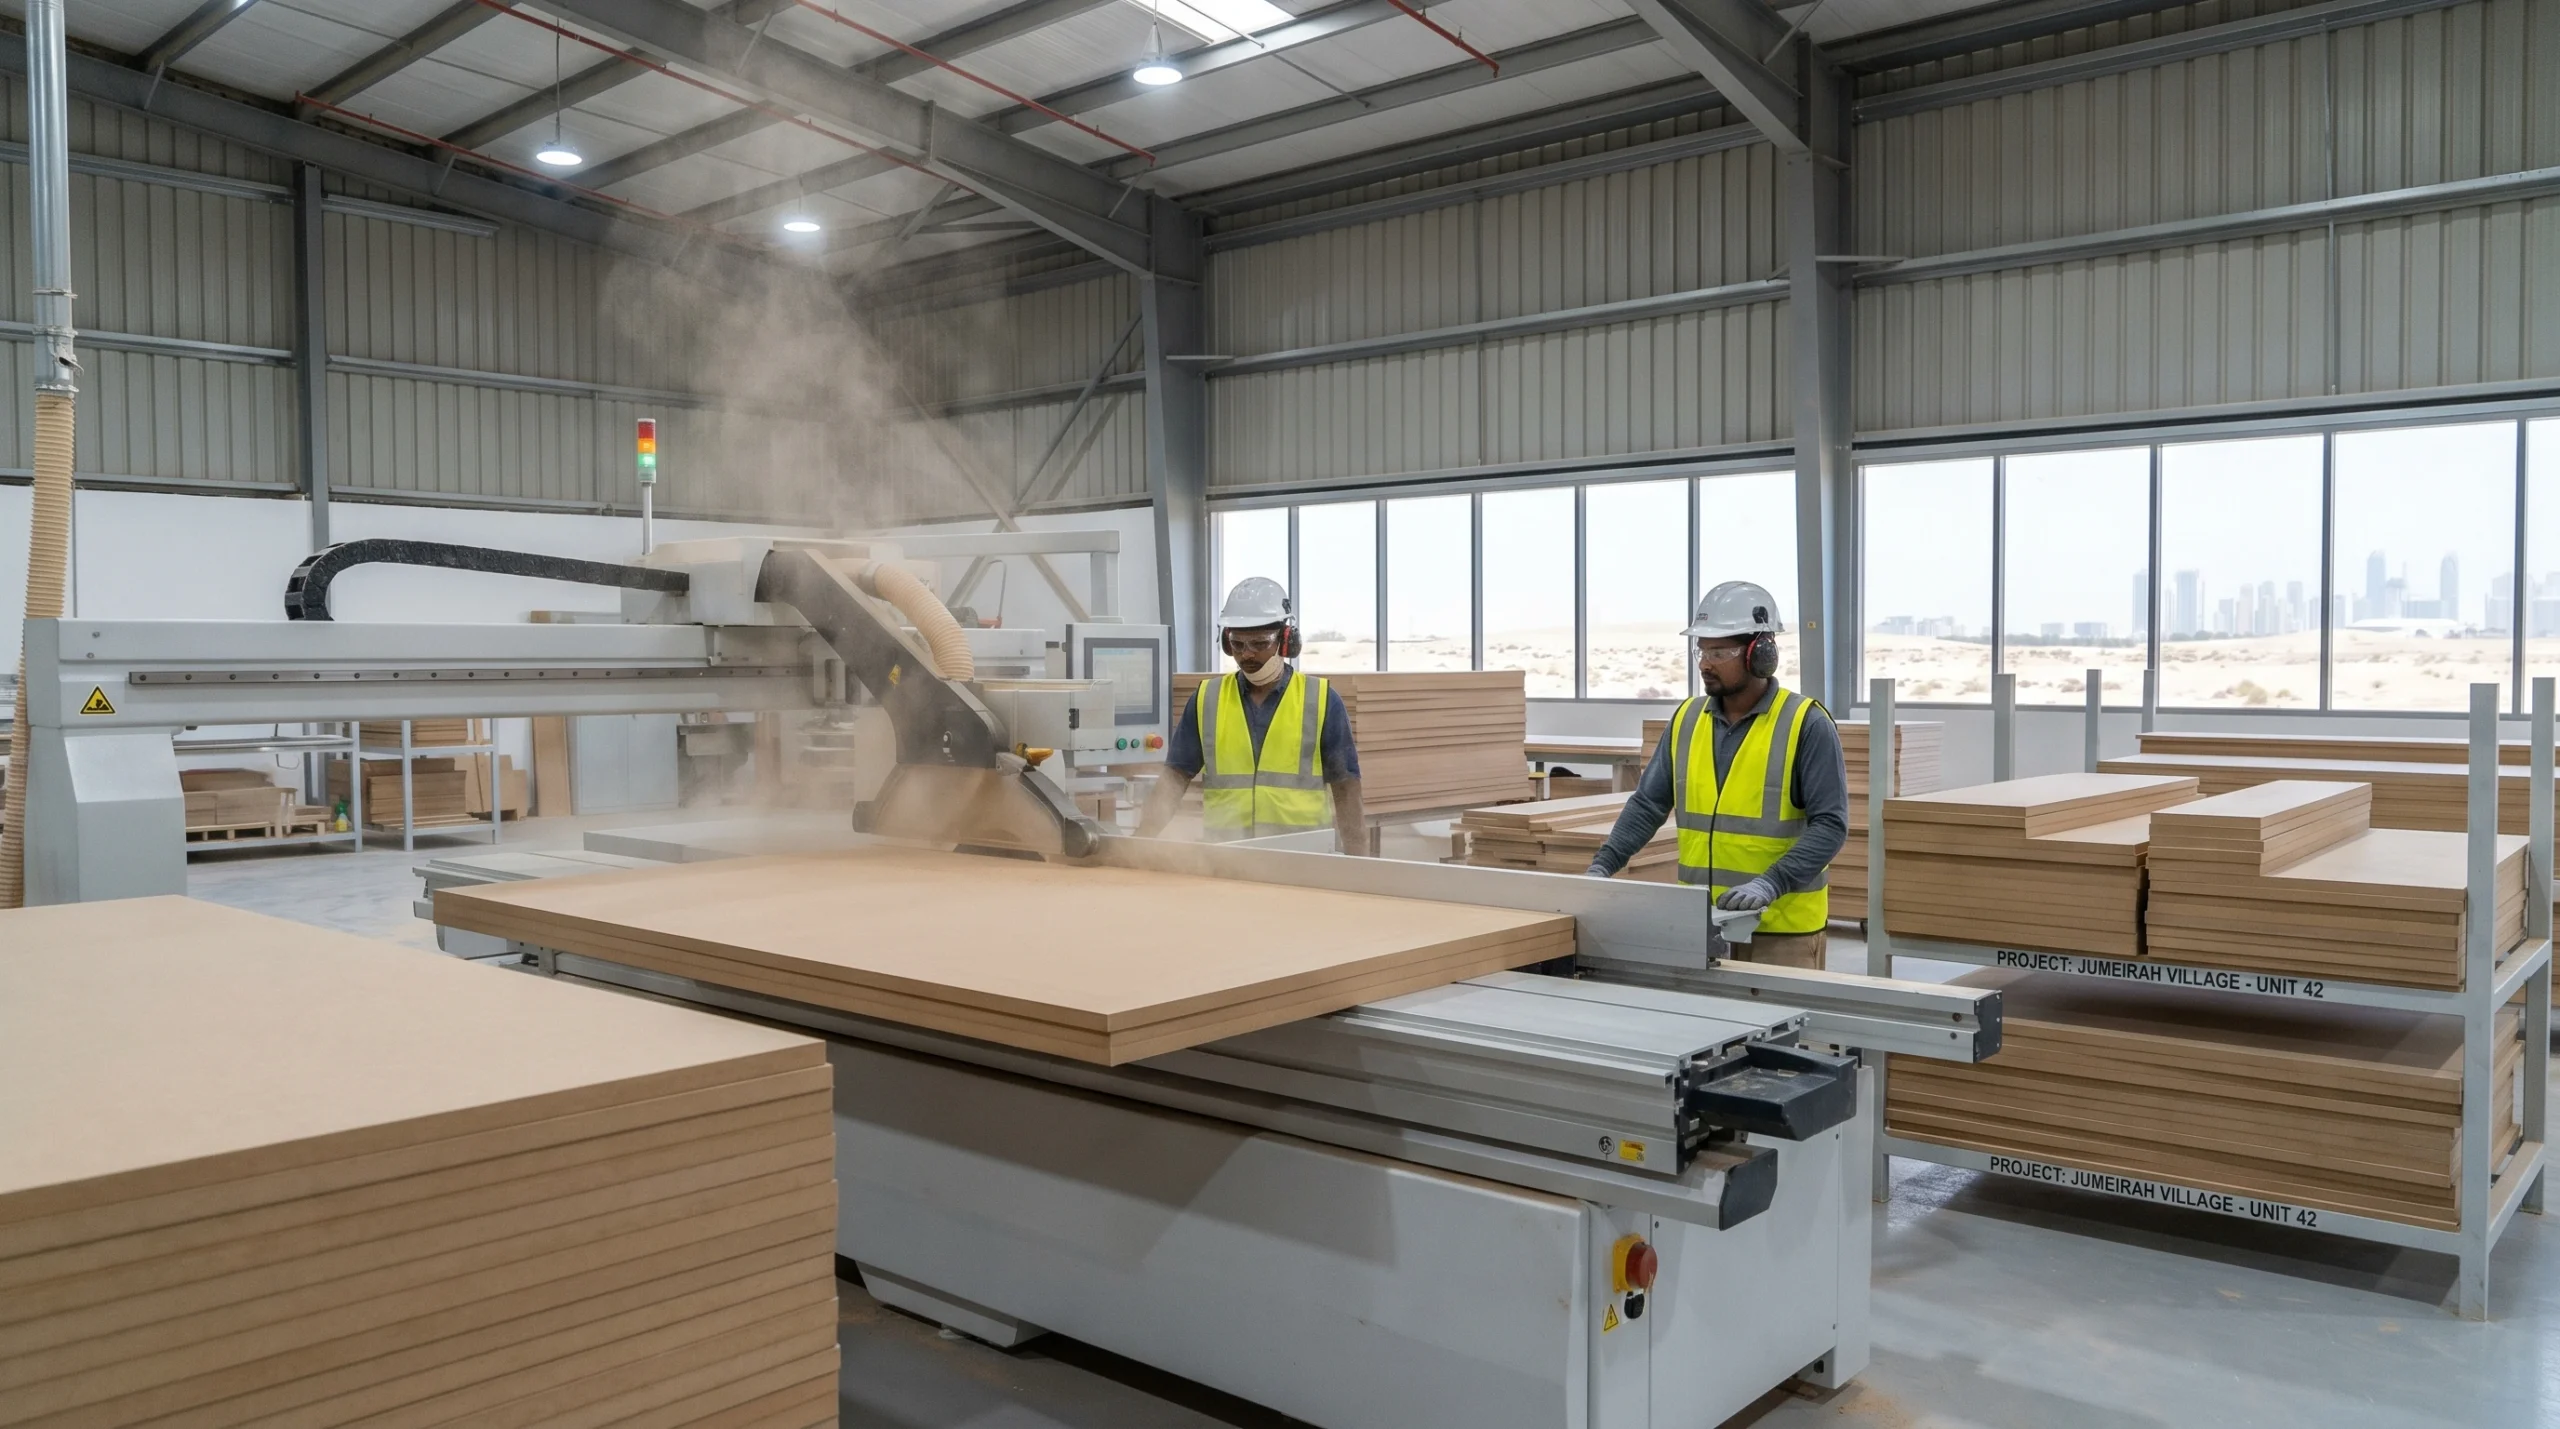
What Happens Between Measurement and Your Installation Day
Most clients never see this stage, but it is where the quality of the finished wardrobe is largely determined. In our workshop, the measurement data is translated into cutting lists, and those cutting lists are run through our panel saws to produce the individual components.
Each component is labelled against the cutting list so that the installation team arriving on site can identify every piece quickly and confirm it against the design. This sounds like basic logistics, but the number of installations we have seen delayed or compromised because workshop components were unlabeled and the installation team had to figure out which piece was which on site is significant.
Edge banding is applied to all exposed cut edges. This is the thin strip of matching material that covers the raw edge of a cut panel. Poor edge banding is one of the most common quality failures in budget wardrobe installations. If it is applied with insufficient adhesive, or if the corners are not properly mitered, it will peel within a few years, particularly in the heat cycling that UAE apartments go through when properties sit unoccupied in summer.
For painted finishes, primer and paint are applied in the workshop under controlled conditions, not on site where dust, temperature variation, and humidity can affect adhesion. This is a non-negotiable aspect of quality finishing that we insist on for all painted wardrobe work.
Fabrication Timeline: What Is Realistic
For a straightforward two-bay fitted wardrobe with standard interior fittings and a melamine finish, workshop fabrication typically takes five to seven working days after design sign-off. Additionally, for a painted wardrobe with decorative elements, allow ten to fourteen working days. For a full walk-in wardrobe with multiple interior configurations, custom pull-out accessories, and a premium finish, allow three to four weeks.
Any company promising you a full custom wardrobe in two days has either cut significant corners in the fabrication process or is supplying you with semi-finished modular components that are not truly custom built to your space.
Stage 5: Site Preparation Before the Team Arrives
What You Need to Do Before Installation Day
A wardrobe installation day goes smoothly when the site is ready. This is something we brief every client on in advance, and it is worth sharing here.
The room needs to be empty. The wardrobe space must be completely clear, including any freestanding furniture, hanging items, and floor coverings that you do not want damaged. We bring dust sheets and use them, but the area directly in front of the installation zone must be accessible without obstruction.
If your wardrobe is going into a newly plastered or recently painted room, the walls should be fully dry and cured. Fresh plaster that is not fully dried will affect the quality of any fixings into it, and in Dubai’s climate, where air conditioning can accelerate surface drying while the core of the plaster is still green, this is a real issue. We recommend a minimum of three weeks after plastering before wardrobe installation in a standard Dubai apartment.
Check that your power points are functional. Our team needs a reliable 220V supply in the room. In renovation projects, particularly in older buildings in Deira or Karama, we have arrived on site to find the room power not yet connected or connected but tripping intermittently. This delays the installation, which ultimately increases your cost.
What We Do the Evening Before
A well-organized installation team does a pre-load check the evening before your installation. They confirm the component list against the cutting list, load the vehicle in delivery sequence (the items that go in first to the installation should come off the vehicle last), and confirm the site access logistics. For buildings with specific delivery windows or goods lift booking requirements, which is common in Marina and JBR towers, this coordination needs to happen at least 48 hours in advance. We manage this for our clients because failing to manage it costs everyone time.
Stage 6: The Installation Day
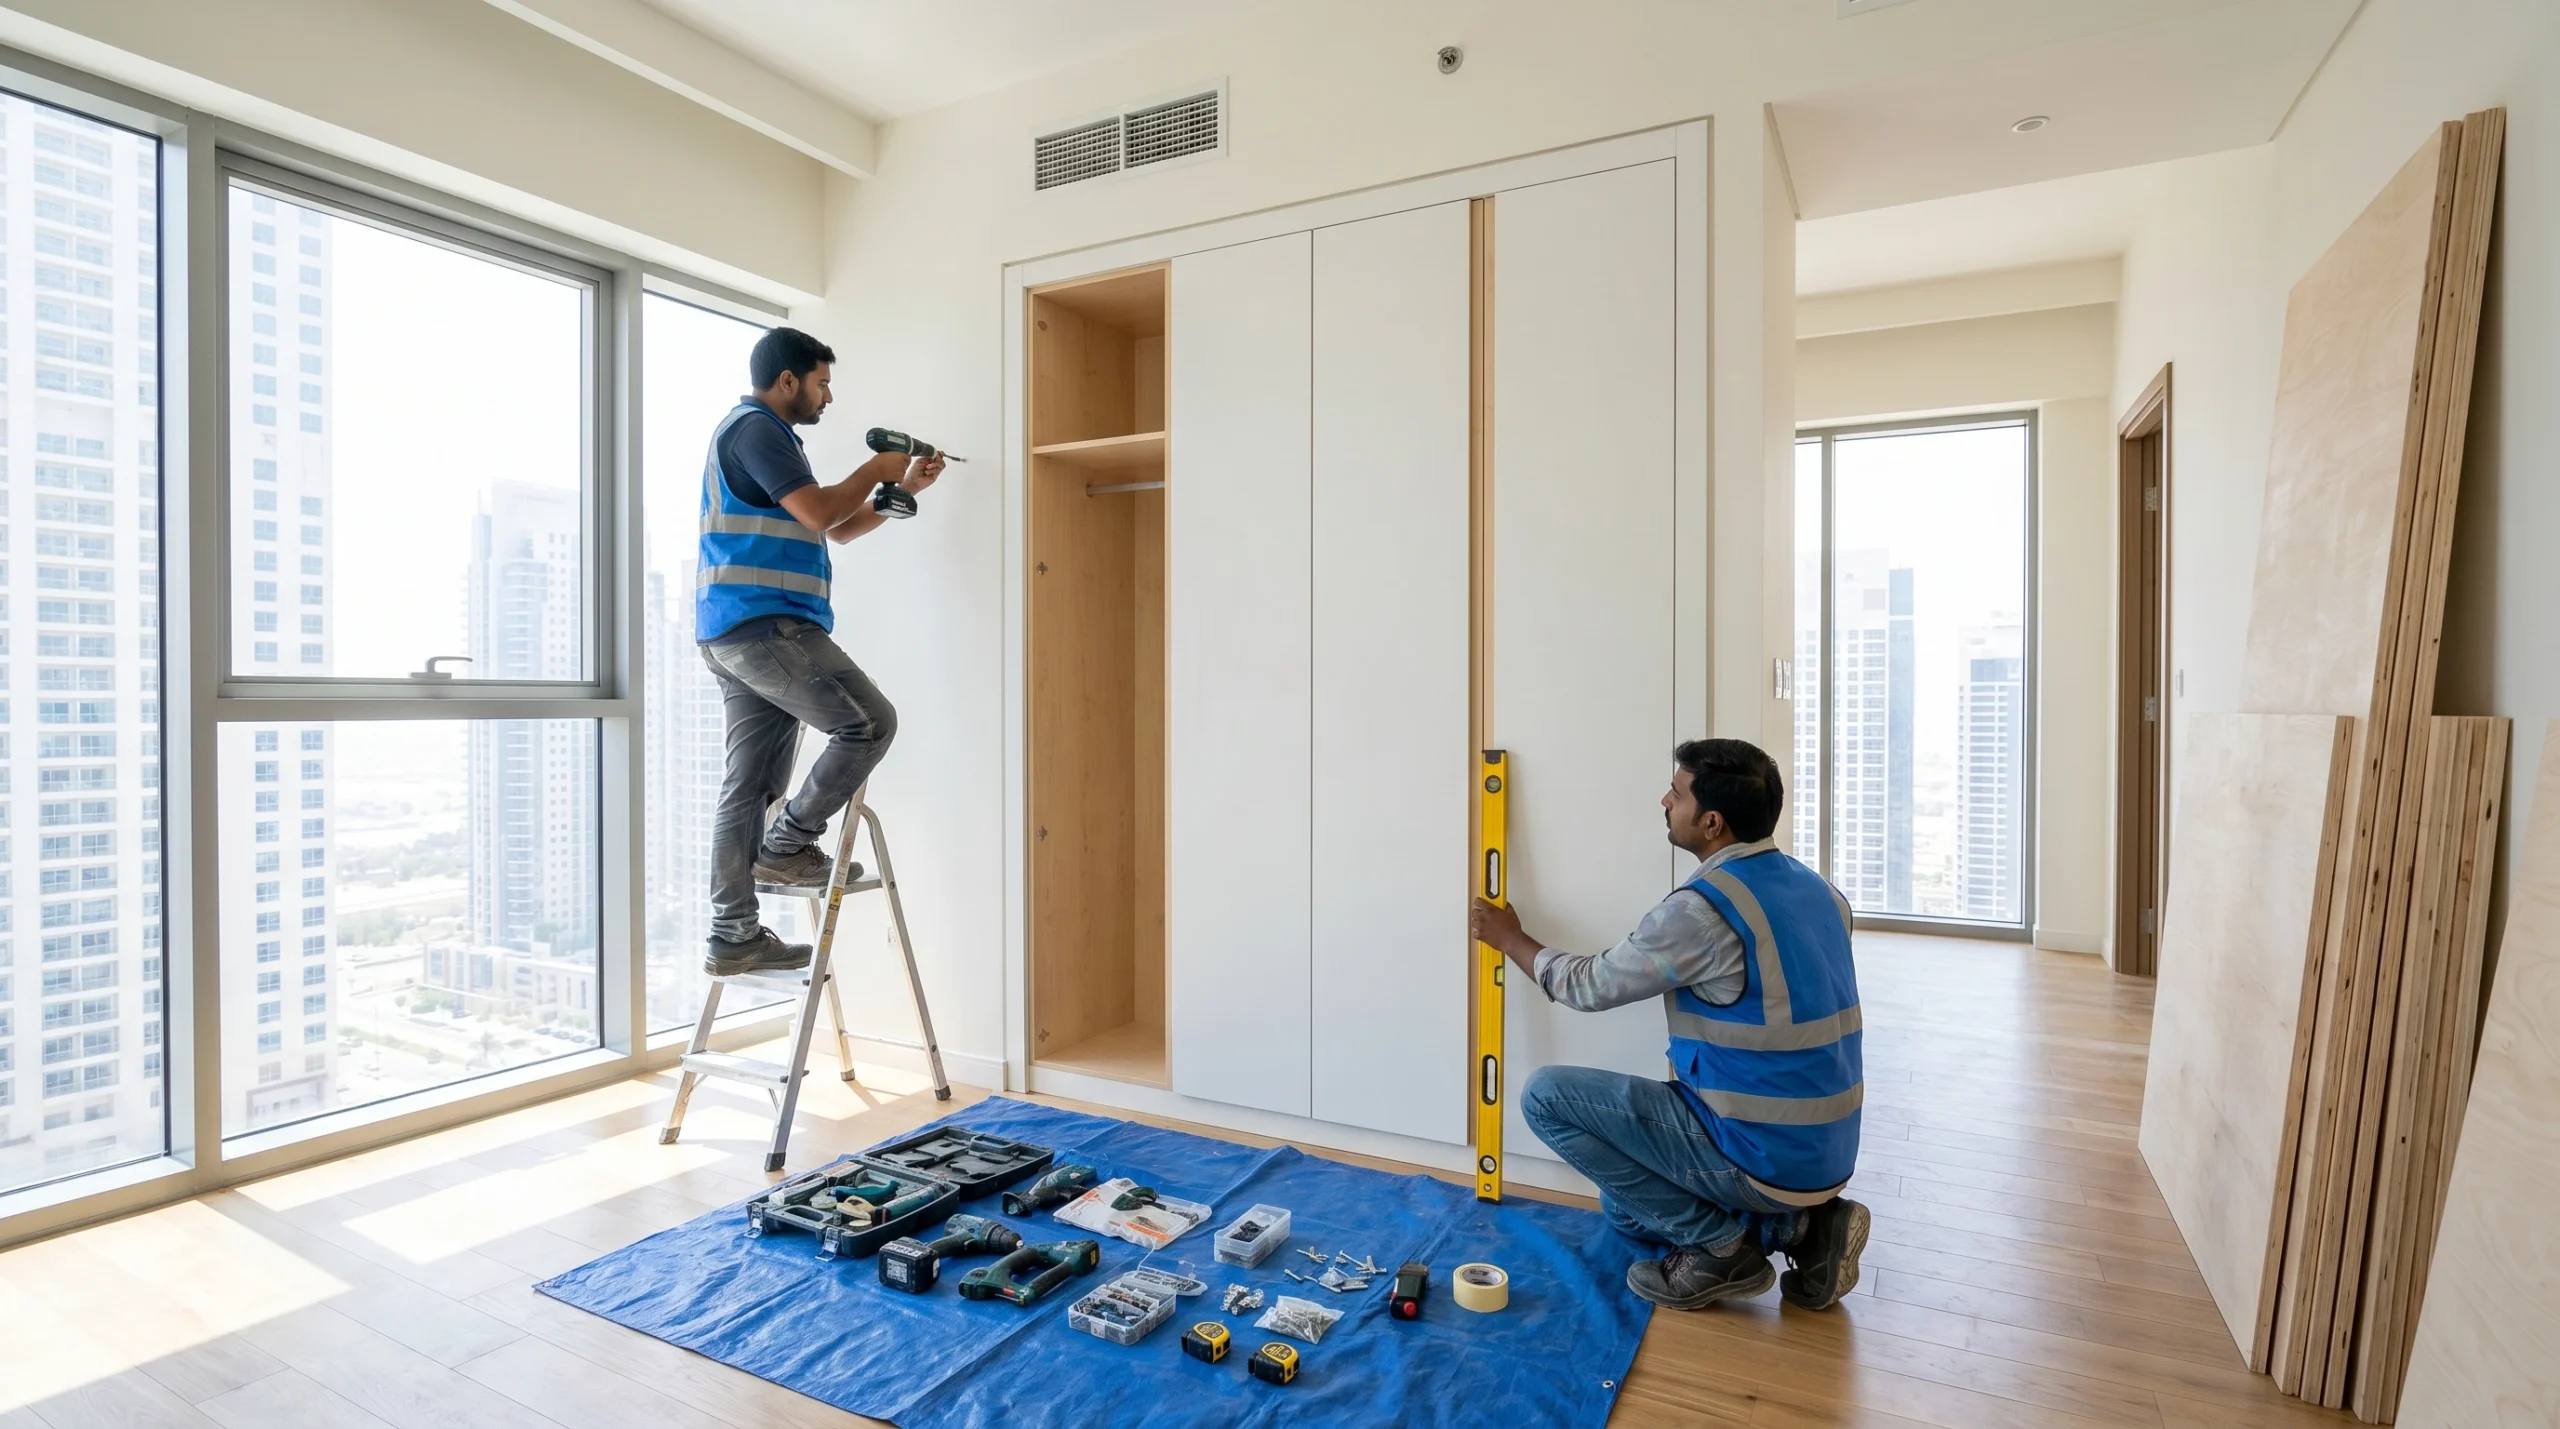
The Sequence That Experienced Teams Follow
Installation day on a two-bay wardrobe typically runs six to eight hours. A walk-in wardrobe may take two full days. Here is the sequence an experienced team follows, and why the sequence matters.
The team begins with a site survey, even though they have the measurement data. Why? Because things change between measurement and installation. Walls get repainted and gain 1.5 millimeters of paint. Flooring gets changed. A skirting board that was scheduled to be removed has not been. This five-minute check prevents the kind of discovery that halts work mid-installation.
Skirting boards in the wardrobe zone are either removed or scribed around, depending on the design. For a truly fitted look, skirting is removed from behind the wardrobe and reinstated on the outside edges. For a scribing approach, the wardrobe base is cut to the profile of the existing skirting, which maintains a clean line without removing original features. In older apartments in Jumeirah with ornate skirting, we often prefer scribing because the skirting is a design feature worth preserving.
The first structural components fixed to the wall are the vertical end panels and any intermediate structural dividers. These are levelled precisely and fixed to the wall using appropriate fixings for the wall type. In UAE residential construction, you will encounter three main wall types: concrete, hollow block, and gypsum partition. Each requires different fixings. Concrete walls take a percussion drill and a frame fixing or a chemical anchor on heavy loads. Hollow block takes a specialist cavity fixing. Gypsum partition requires a wall plate spanning to multiple studs. Using the wrong fixing for the wall type is the most common cause of wardrobe structural failure that we see when called in to repair another company’s work.
The Level and Plumb Checks That Happen Throughout
An experienced installation team checks level and plumb at every stage, not just at the beginning and the end. As each component is added, the assembly can rack slightly. Early correction is simple. Late correction, once several components are fixed, is complicated and sometimes means removing work already done.
In a quality installation, the top of the wardrobe at the ceiling is dealt with specifically. There are two approaches: scribing the top panel to the ceiling profile, which gives a truly fitted look but requires patience and skill, or using a cornice or trim to close the gap neatly. Both are correct in the right context. Scribing is appropriate in rooms with simple flat ceilings. Cornice or trim is often the more practical and equally attractive solution in rooms with cornicing already present, or where the ceiling has a pronounced droop or camber.
Door Hanging and Adjustment
Doors are the last major component fitted, and door adjustment is where a significant amount of the installation time is spent. This is not a sign of poor workmanship. It is the opposite.
For hinged wardrobe doors, the hinges allow three-dimensional adjustment: height, depth, and lateral position. Getting every door to hang in the same plane, to close with even gaps, and to sit flush with adjacent doors requires systematic adjustment and the patience to check the result repeatedly. A wardrobe with six hinged doors has 18 to 24 adjustment points. Setting all of them correctly takes time.
For sliding doors, the adjusters are in the top track rollers and, if present, the bottom floor guide. Once set, sliding door adjustment is generally stable unless the floor moves significantly or the rollers wear. We set sliding doors to a tolerance of 1 millimeter for the overlap between doors and 2 millimeters for the gap at the top and bottom.
Stage 7: Snagging, Checking, and Handover
Why the Snag List Exists
In the UAE construction and fit out industry, the snag list is a formal part of every professional handover. It is the list of items that need correction before the job is considered complete. Any company that does not produce a snag list as part of their process is skipping a quality control step that protects both parties.
A snag list for a wardrobe installation typically includes items like: a door that needs a hinge adjusted, an edge band corner that was bumped during installation and needs a small repair, a pull-out drawer that catches slightly at full extension and needs the runner adjusted, or a paint touch-up on a panel that was scuffed during handling. These are normal, minor items. The point of the snag process is that they are identified, documented, and resolved before final payment.
We walk through every installation with the client before they sign off. We open every door and drawer, we operate every pull-out fitting, we check every visible surface. If we find something we are not satisfied with before the client even notices it, we flag it ourselves. This is the standard we hold ourselves to after 35 years in this market.
What a Good Handover Includes
A professional wardrobe handover in Dubai includes several things beyond simply handing over the keys.
You should receive a warranty document. Karnak’s standard warranty covers fabrication and installation workmanship for three years. The warranty should state clearly what it covers, what it excludes, and how to make a claim.
You should receive care instructions specific to your finish type. A painted wardrobe, a melamine wardrobe, and a lacquered wardrobe all have different cleaning requirements. Using the wrong cleaning product on a lacquered surface, for example, can cause hazing or adhesion loss over time. We provide this in writing so there is no ambiguity.
You should be shown how to make minor adjustments yourself. Hinge adjustment screws are not mysterious. Showing a client how to tighten or re-center a hinge that has shifted slightly means they can deal with minor adjustments without needing to call us for something a homeowner can handle in 30 seconds with a cross-head screwdriver.
You should receive the contact for post-installation support. Not just a general company number, but a specific channel for after-sales queries.
Common Mistakes in Wardrobe Installation and How to Avoid Them
Mistake 1: Skipping the Full Measurement Survey
The most common mistake we see homeowners make is accepting a quote from a company that measured the space themselves in under 10 minutes, or worse, asked the homeowner to send dimensions over WhatsApp. The result is typically a wardrobe that does not fit precisely, with gaps at the ceiling or floor that reveal the space was never properly measured, or panels that were cut slightly short and cannot be adjusted on site.
In Dubai specifically, where buildings settle and walls are rarely truly flat, skimping on measurement time is a false economy. A proper measurement costs the company time and therefore money. Companies that skip it are not doing you a favor. They are reducing their cost at your expense.
Mistake 2: Choosing Material Based on Price Without Understanding the Environment
We have installed wardrobes in an apartment in The Greens that were originally fitted by another company using standard chipboard. Within two years, the panels closest to the air conditioning unit had absorbed enough moisture during the unit’s off cycles to develop visible surface blistering. Replacing those panels cost more than the original saving on materials would have been.
In UAE, moisture-resistant board is not a luxury specification. It is the correct specification for the environment. The price difference between standard and moisture-resistant board on a typical two-bay wardrobe is approximately AED 200 to 350. The cost of replacing moisture-damaged panels is several thousand dirhams. The math’s is straightforward.
Mistake 3: Ignoring Wall Type When Specifying Fixings
We have been called to inspect wardrobes across Dubai that were structurally failing because they were fixed to gypsum partitions using fixings designed for concrete walls. In a gypsum partition, a standard masonry anchor has nothing to grip. Over time, the fixing works loose, the wardrobe starts to pull away from the wall, and in a worst case it becomes a safety issue.
Always ask the installer what wall type they are fixing into and what specific fixings they are using. A professional will give you a clear answer. If they look uncertain or give you a vague response, that should concern you.
Mistake 4: Accepting a Timeline That Is Unrealistically Short
A proper custom wardrobe cannot be designed, measured, fabricated, and installed in three or four days. When you see companies advertising this, they are either using pre-manufactured modular components that are not truly custom, or they are rushing a process that should not be rushed.
Rushing fabrication means boards cut to insufficient tolerances. Additionally, rushing the paint process means finishes that peel or crack within a year. Moreover, rushing installation means fixings that are not properly set, doors that are not properly adjusted, and snag items that are never addressed.
In our experience, a realistic timeline from design sign-off to installation completion for a standard fitted wardrobe in Dubai is two to three weeks. For a walk-in wardrobe with premium finishes, four to six weeks. If you need it faster for a genuine reason, discuss that honestly with the carpenter. Sometimes it is possible to expedite. But it should be an exception, not the default promise.
Mistake 5: Not Confirming the Warranty in Writing Before Work Starts
Verbal warranties are not warranties. In the UAE, as anywhere, a warranty is only as strong as the document behind it. Before any carpenter starts work in your home, you should have a written scope of work, a written quote, and a written warranty statement. What does it cover, for how long, and what is the process to make a claim?
We have had clients come to us asking for help after another company’s wardrobe failed, only to find that the company either no longer existed or was disputing the claim on the basis that the warranty terms were never formally agreed. Protect yourself.
Mistake 6: Underspecifying the Interior Fittings
Clients often put significant thought into the exterior design of the wardrobe and relatively little thought into the interior. Then they live with it for a year and realize the interior organization does not match how they actually use the space. How many full-length hanging items do you have?. Additionally, how many shirts that need shorter hanging space?. Moreover, how many shoes, and are they better on open shelves or pull-out racks?.
In our design consultation, we ask these questions specifically. Taking 30 minutes to think through your storage needs properly before finalizing the design will give you a wardrobe that works as well in practice as it looks in the render.
Wardrobe Installation Costs in Dubai: What You Should Expect to Pay
Pricing for wardrobe installation in Dubai varies significantly based on material quality, interior specification, finish type, size, and the experience level of the company doing the work. Here is a realistic breakdown based on current market conditions in 2026.
A standard single-bay fitted wardrobe, 900 millimeters wide, floor to ceiling, with a melamine finish, basic interior of hanging rail and two shelves, and hinged doors, should cost in the range of AED 1,800 to AED 2,800 for supply and installation. Below AED 1,500, you are almost certainly getting sub-standard materials or inadequate installation practice. Above AED 3,500 for this specification, you are likely paying for a brand name rather than additional quality.
A two-bay wardrobe, approximately 1,800 millimeters wide, same specification, should run AED 3,500 to AED 5,500 depending on the interior fittings. Adding pull-out accessories like belt trays, tie racks, jeweler drawers, or internal LED lighting will add AED 800 to AED 2,500 depending on the quantity and specification.
A full walk-in wardrobe in a master bedroom, typically 8 to 15 square meters, with a premium finish, full interior specification, and island unit, represents a significant investment. Realistic pricing for a high-quality walk-in in Dubai in 2026 ranges from AED 18,000 to AED 45,000 depending on size, material, and specification. Projects on the Palm or in Emirates Hills with premium materials and finishes can exceed this.
Expert Tips From 35 Years of UAE Wardrobe Installations
Plan your interior before you finalize the exterior design.
The door layout and panel positions need to align with your interior requirements. If you decide you want a specific drawer configuration after the doors are already designed, you may not be able to accommodate it without changing the door design too.
Build in 10 to 15 percent more hanging space than you think you need.
Every client who has lived in their home for more than two years has more clothes than they did when they moved in. Build the wardrobe for your future self, not your current self.
Specify internal lighting before fabrication.
Retrofitting lighting into a completed wardrobe is expensive and often compromised. LED strip lighting, internal pull-out lights, or sensor-activated door lights should be in the design from the start so that cable routing is built into the structure.
In coastal Dubai communities, ask specifically about edge sealing.
The base panels of your wardrobe, which are closest to the floor and most exposed to any humidity coming off the ground, should have sealed edges. This is standard practice for us. It is not standard practice for everyone.
Keep the original installation drawings.
If you renovate in the future, or if you need warranty work, having the original cutting plans and component drawings saves significant time. We provide these to all clients. Store them somewhere you can find them.
Think about socket placement before installation, not after.
If you want a socket inside your wardrobe for a phone charging station or for powering internal lighting, arrange for the electrician to position it before the wardrobe goes in. Adding a socket inside a completed wardrobe requires opening up the wall, which means removing wardrobe components to access it.
Do not accept same-day final payment pressure.
A professional company will complete the snag list and conduct a proper handover before requesting final payment. If you are being pushed to pay in full the moment the last door is hung, before a proper walkthrough, that is a sign that the company does not expect the post-installation experience to be positive.
Conclusion: A Well-Installed Wardrobe Is an Investment, Not an Expense
The wardrobe installation process in Dubai, done properly, is a careful sequence of interconnected steps. Each one affects the next. A careless measurement creates problems in fabrication. A rushed fabrication creates problems on installation day. A hurried installation creates problems at handover. And problems at handover create problems for the next five to ten years of living in your home.
We have been doing this long enough to know that clients who understand the process are better clients, not because they are easier to manage, but because they make better decisions. The wardrobe installation process we have described here is what we do on every project, from a single bay wardrobe in a studio apartment in JLT to a full bespoke walk-in in a villa on the Palm. The scale changes. The process does not.
Key Takeaways:
- Proper measurement in Dubai requires checking walls at multiple heights and must account for floor levelness and ceiling variation, not just room width.
- Moisture-resistant board is the correct specification for UAE residential wardrobes, not an optional upgrade.
- Fixings must be matched to the specific wall type: concrete, hollow block, or gypsum partition each require different approaches.
- A realistic timeline from design sign-off to installation completion is two to four weeks for standard work, longer for premium finishes.
- A professional handover includes a written warranty, care instructions, and a formal snag resolution process before final payment.
Need Expert Help?
Karnak Carpentry has been installing bespoke wardrobes across Dubai and the UAE since 1988. Our team of experienced craftsmen handles every stage in-house, from site measurement to workshop fabrication to installation and handover. We do not subcontract our work. Every project carries our full three-year workmanship warranty. If you are planning a wardrobe installation and want it done to a standard that lasts, we would be glad to schedule a no-obligation site visit and consultation.
Contact: WhatsApp Us or Call Us at +971-52-5554207 | info@karnakcarpentry.com
Frequently Asked Questions About the Wardrobe Installation Process in Dubai
What is the first step in a custom wardrobe installation?
Every wardrobe project begins with a site visit and detailed measurements. A designer records wall dimensions, ceiling height, floor levels, electrical points, and any architectural features before preparing the wardrobe layout.
How do professionals measure a wardrobe accurately?
Experienced installers measure the width, height, depth, corners, ceiling variations, and floor levels using precision tools. Multiple measurements ensure every cabinet fits perfectly without leaving unwanted gaps.
What happens after the measurements?
Designers prepare a 2D or 3D wardrobe layout based on your room dimensions and storage requirements. After you approve the design, the production team starts manufacturing each component.
Which materials work best for custom wardrobes in Dubai?
Marine plywood, moisture-resistant MDF, premium laminates, acrylic panels, and natural veneers perform exceptionally well in Dubai’s climate. These materials provide strength, stability, and long-lasting durability.
How long does wardrobe manufacturing take?
Most custom wardrobes require two to five weeks for production. Project size, material selection, design complexity, and hardware availability influence the overall timeline.
Why do manufacturers use CNC machines for wardrobe production?
CNC technology cuts every panel with outstanding precision and consistency. Computer-controlled manufacturing reduces waste, improves accuracy, and creates cleaner joints throughout the wardrobe.
What happens on wardrobe installation day?
Installation teams assemble the cabinet frames, secure them to the walls, align every panel, fit the doors, install the drawers, adjust the hardware, and complete the finishing details before the final inspection.
How long does wardrobe installation usually take?
A standard bedroom wardrobe typically takes one day to install. Larger walk-in wardrobes or multi-room projects may require two or more days to complete.
Which wardrobe accessories can I include?
You can add pull-out drawers, shoe racks, jewelry organizers, trouser holders, tie racks, LED lighting, soft-close drawers, laundry baskets, and adjustable shelves to improve organization and convenience.
How do installers ensure every wardrobe door aligns correctly?
Technicians adjust hinges, level every cabinet, fine-tune the door gaps, and test each moving part several times. Careful adjustments create smooth opening, quiet closing, and a perfectly aligned appearance.
What quality checks take place before project handover?
The installation team inspects panel alignment, drawer movement, shelving strength, hardware performance, edge finishing, and overall workmanship before presenting the completed wardrobe to the homeowner.
Can I customize the inside of my wardrobe?
Yes. Custom interiors allow you to create dedicated sections for hanging clothes, folded garments, handbags, shoes, accessories, luggage, seasonal storage, and personal collections according to your lifestyle.
Do built-in wardrobes increase property value?
Professionally designed built-in wardrobes improve storage, enhance room aesthetics, and maximize available space. Many buyers view custom storage solutions as a valuable feature in Dubai homes.
What mistakes should homeowners avoid during wardrobe planning?
Avoid overlooking storage needs, choosing low-quality hardware, ignoring lighting, or skipping accurate measurements. Thoughtful planning creates a wardrobe that remains functional for many years.
How can I choose the right wardrobe installation company in Dubai?
Review completed projects, compare material specifications, inspect hardware quality, confirm warranty coverage, and request transparent quotations before selecting a company. Reliable installers explain every stage from measurement to final handover.
Related Articles
- The Complete Guide to Hardwood Flooring Installation in Dubai Apartments
- How Custom Kitchen Cabinets Are Made: A Complete Behind-the-Scenes Look at the Dubai Process
- Solid Wood vs. MDF vs. Plywood: Which Material Is Right for Your Dubai Home?
- How to Care for Wooden Floors in the UAE Climate: A Master Craftsman’s Guide